Showing posts with label DIY. Show all posts

Tuesday, April 19, 2011

Sucking Pads for your Ergo, Beco, Boba, Mei Tai, Bamberoo, Baby Bjorn, BabyHawk and More!


Sucking pads for your baby carrier!

Shop for Red Charlotte Sucking Pads in my Etsy shop.

These sucking pads fit the Ergo, Beco, Boba, Mei Tai, Bamberoo, Baby Bjorn, BabyHawk and More!

Red Charlotte Sucking Pads available with ribbon taggies on one side or both sides. Babies love to play with taggies and you can easily hang linky toys and pacifiers from these ribbons.

Don't see a fabric you love? Contact me for a custom order at redcharlotte (at) gmail (dot) com.

More details available in my Red Charlotte Etsy shop.

Sunday, June 6, 2010

Taking a Break

As Cora's due date (July 29th!) approaches I have been less able to create pretty things and focus on my little Etsy business. I'm going to take a break on this blog for awhile and keep focusing on my posts over at our boat blog: http://rebelheart.squarespace.com/charlottes-blog/.

Feel free to join me over there!

I will be back to Red Charlotte though, and I have a few new ideas and tricks up my sleeve for when I return. Until then, keep creating and have fun with D.I.Y.!!

Sunday, April 18, 2010

Custom-fit Sheets for the Boat

Stop by my sailing blog to see some of my recent work on the boat. I've made fitted sheets for the seaberth and the v-berth.

I'm using fabric from Alexander Henry's Good Earth collection for the seaberth.

For the v-berth I used fabric from Amy Butler's Lotus collection. The boat is a much cheerier place now. After the seaberth is done, I'll be starting on the cushions on the settee in the salon. Enjoy!

Monday, March 29, 2010

Handmade Sheets for the Boat!

Check out the sheets I made for our boat on our sailing blog here. So happy to be
creating fabulous DIY again!

Tuesday, March 23, 2010

Solar Cooker

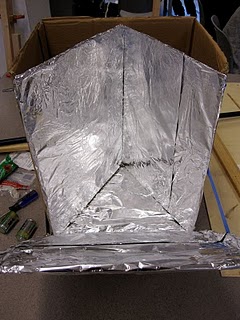
In the process of making a solar cooker. I've wanted to try one for a long time. I'm going to try cooking something delicious tomorrow and will let you know how it goes:

I think I'm going to start easy and bake some cookies from pre-made dough, just to see how this things cooks. I'm just going to leave it out during the day at school and make sure it is at a good angle to the sun as the day goes by. One of my students is bringing her solar tea kettle. We'll have a feast!

**Update** the cookies are "cooking," which translates to mean: I put them out in the sun on a black cookie sheet and now I'm waiting. No idea if this will work! I'll post pics a bit later!

We just used some pre-made cookie dough and my student brought the tea and solar tea kettle from her house. Here we have the cookies as they'll look when we place them outdoors:

From what I've read you can cover your cooking with a glass lid or top or an oven backing bag (clear) to keep off flies and to trap heat but I'm just trying this today sans cover. (Haven't seen any flies yet so cross your fingers.) Honestly there will probably be more saw dust in these cookies than flies as my students are constructing medieval weapons today on the same balcony that the cookies are baking on.

Below are the cookies 25 minutes into baking. It's working!!!! I turned the sheet around to create oven baking. I'll probably have to keep rotating it every 20-25 minutes. The cookie sheet was HOT to the touch. Will use a hot pad for the next rotation:

****************************************************

Update: It's 12:14 and the cookies still aren't cooked, but they're cooking. I've had to drag the cooker to follow the sun and at one point I found it in the shade, so I'm not sure how long this will take. The problem is we're on the third floor of the school and the outside patio has a big cover on it so I'm working with an angle of the sun. I wonder if they'll be done by this afternoon?

Update: Well I finally pulled the cookies out of the cooker at 2:30 as we started to clean up for the day. They had started to firm and crust up but were still raw and doughy in the middle. I had a few student volunteers thoroughly wash their hands and then pinch off bits of the cookies from the pan as they were too undercooked to pick up as single entities and eat. The cookies disappeared but I think that's because people like chocolate chip cookies cooked or uncooked. This is what they looked like at 2:30 when I pulled them off. One bummer about using store dough was how oily they were. I don't think homemade dough would have released this much oil (as homemade dough doesn't use oil).

I'm going to try another batch tomorrow. I'll start at the same time but try to position them in more direct sunlight the whole time. I'm very interested in seeing how good I can get at solar cooking with a homemade cooker as the ones I've seen online to purchase are fairly pricey. It would be great to know how to use one while we're sailing, especially in the South Pacific and other hot areas. The cabin will be unbearable if I have to use the oven or stop during the day to make meals.

Wednesday, January 6, 2010

Projects for the New Year

It's January and I have a new digital camera! Hallelujah. I'm offering the same DIY/Craft class at school as I did last semester so I'm looking forward to meeting my new students and seeing what creative projects they come up with.


The first projects I'll be working on are this storage container created by ReadyMade Magazine. It's Pringles cans covered in Contact Paper and glued together. So cool.

I'll also be refinishing some beautiful teak lawn chairs and of course, working on my jewelry display boxes.

What are you working on?

Friday, October 23, 2009

Inspiration is Everywhere - Magazine Page Pennant

I'm addicted to pretty little hanging pennants (also called banners or bunting.) Here is one I made from Yoga Journal and Real Simple magazine pages for a friend in a craft swap.


I highlighted an adorable pennant on Etsy in this post last month and below is a DIY I'm planning on making from Cathe Holden's blog Just Something I Made.

I'll post pics of my own once I've made it. If you haven't checked out Cathe's blog yet, head over when you get the chance. She is a great designer and offers a ton of freebies and tutorials.

Tuesday, October 20, 2009

Halloween Pennant - Printable Freebie


I made this sweet little Halloween pennant for a craft swap on http://www.momsasylum.com/. No, I'm not a mom, but I fell in with this great group of ladies and just love it there. I've included links to the pennant below for free download. Feel free to contact me for the Photoshop files if you'd like them.

Oh, a tip. Use a pretty black ribbon to sew the pieces together but make sure your ribbon doesn't get twisted. Mine did and I had already finished before I noticed. It was still cute, but I'll try to save you the trouble.


Halloween Banner 'T'
Halloween Banner 'R'
Halloween Banner 'I'
Halloween Banner 'C'
Halloween Banner 'K'
Halloween Banner 'or'
Halloween Banner 'E'
Halloween Banner 'A'

*As always my free tutorials/printables are for personal use only. ;)

Friday, October 16, 2009

More Creations from Craft Class


Featuring from left to right: Rachael's paper star earrings (modeled by Tobi), Marlene and Lulu's plushie, Nicole's Bob Marley painting, and Ahsaki's pirate plushie.

Above we have Brendon working on one of her cosplay wigs and Coco and Taylor working on the base coat for a chair design they created.

To all the ladies and one gentleman in my class (just wait until you see what Jeremy is working on), thank you for really diving right into this class. It is so inspiring to see what you come up with and it is so motivating to work with you every day.

Thursday, September 24, 2009

Morgan's Box


This is Ruthie and this is the box she made for her friend Morgan:


Aside from the wonderful hand-painted stripes and hand-drawn name, I am so impressed with how classy a simple cardboard box can look. What a great way to repurpose material and what a wonderful gift for a friend. Well done Ruthie!

Thursday, September 17, 2009

Creation ~ In Progress

A few shots of the class at work:


More to come as our creations continue!

Thursday, September 3, 2009

What are You Working On?


I've been wanting to make a cloth pennant/banner for quite a while. This is one from Sweet Jessie's Shop on Etsy.com. I'm going to start with a paper pennant first in a fall theme for a craft swap I'm participating in.


I also want to whip up some of the boxes I mentioned in this post for some of the new teachers at my school.

What are you working on?

Thursday, August 13, 2009

Inspiration is Everywhere - Rainy Day Cloud Box by ISLY


When I first discovered the wonders of Etsy.com and started to dig deep into DIY and the handmade movement I just couldn't believe how creative people were. I have a long blog roll I read every day in Google Reader and it is chock-full of blogs where people continue to dazzle me with their ingenuity and craftiness.


This craft is from ISLY (I Still Love You). I love how she describes her inspiration for the project and that she offers the template for her readers to download for free. You can guarantee that many of my fellow teachers and maybe even a student or two will be receiving one of these boxes this coming school year.

Sunday, August 2, 2009

First Handmade Prototype

Whoohoo! I finally compiled all of the tools I needed to start trying to hand-make my own version of my jewelry display cases. Eric helped me on this end.

Honestly, it was more moral support than anything else. I had made a dozen runs to Home Depot and Michael's searching for the perfect paint, for hooks of all sizes, for screen, for sawtooth hangers and L-braces, etc, but when it came to buying a mitre box I just really wanted someone standing with me in the Home Depot tool aisle debating the virtues of which yellow box was better, and it helped, it really did.

So I installed the box on the work table in our storage shed and got to work cutting angles on the wood I had picked up. I can't believe how much I've learned, and I'm not even finished with the first prototype.

Here are some more shots of what I'm working on:

Using the mitre box

Spacing out the different hooks

Bringing the pieces together & more to come!