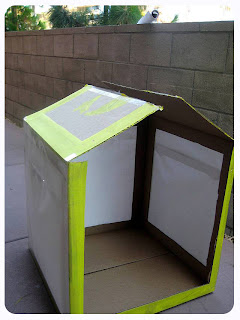
Wednesday, November 25, 2009

Meaningful Gift Giving

My camera is officially dead. This is so, so sad. I like to document my progress on the shop and post what I've done, but until I get a new camera you just have to believe me that I'm working on things! Things are good and I'm making progress.

In the meantime, I've been thinking about Christmas. Eric and I have never been big Christmas spenders. Last year we took off for the holidays and celebrated our honeymoon instead. What a stress-free way to go through the holidays. We're planning on doing a repeat again this year, but I still want to get Eric something.

Meet the Giver's Log. This is a beautiful blog about giving gifts, wrapping gifts, and gift ideas.


Inspired by this blog post, I'm thinking of getting Eric something he wants, something he needs, and something he can treasure. I'm always trying to not spend a lot of money, so I've got to be thrifty and creative. I think the 'treasure' gift may be something I create that can be printed on this free canvas being offered by http://www.canvaspeople.com/.

How do you approach gift giving each year?

Sunday, November 8, 2009

My Shop - Progress Update

I came up with the idea to open my own Etsy shop in April of this year. Since then I have spent approximately 100 hours researching Etsy, small businesses, photography, crafting, and the potential market for my jewelry display boxes.

This weekend I worked on filling in a few gaps in my boxes with wood filler and sanding them to perfection. This week I will be painting and working on stenciling some designs I've found. My camera recently died (RIP), but I want to keep my blog posts going until I can get a replacement.

I'm hoping to do a soft opening of my Etsy shop during the Christmas break and will keep you posted on my progress.

If you read this and are also working on a big project, how are you doing? What are you working on now?

(Pillow from www.pillowfarmer.etsy.com. Isn't it fabulous?)


Friday, October 23, 2009

Etsy Finds - Vandalized Vintage Plates and Arts

Trixie Delicious' Shop on Etsy creates "vandalized vintage" items like this fabulous set of plates on the seven deadly sins. More highlights below.


I'd love to have tea with a girlfriend with that kiss and tell set!


Inspiration is Everywhere - Magazine Page Pennant

I'm addicted to pretty little hanging pennants (also called banners or bunting.) Here is one I made from Yoga Journal and Real Simple magazine pages for a friend in a craft swap.


I highlighted an adorable pennant on Etsy in this post last month and below is a DIY I'm planning on making from Cathe Holden's blog Just Something I Made.

I'll post pics of my own once I've made it. If you haven't checked out Cathe's blog yet, head over when you get the chance. She is a great designer and offers a ton of freebies and tutorials.

Tuesday, October 20, 2009

Halloween Pennant - Printable Freebie


I made this sweet little Halloween pennant for a craft swap on http://www.momsasylum.com/. No, I'm not a mom, but I fell in with this great group of ladies and just love it there. I've included links to the pennant below for free download. Feel free to contact me for the Photoshop files if you'd like them.

Oh, a tip. Use a pretty black ribbon to sew the pieces together but make sure your ribbon doesn't get twisted. Mine did and I had already finished before I noticed. It was still cute, but I'll try to save you the trouble.


Halloween Banner 'T'
Halloween Banner 'R'
Halloween Banner 'I'
Halloween Banner 'C'
Halloween Banner 'K'
Halloween Banner 'or'
Halloween Banner 'E'
Halloween Banner 'A'

*As always my free tutorials/printables are for personal use only. ;)

Sunday, October 18, 2009

Jewelry Display Box 2.0


I started work on my second jewelry display box prototype. I need to come up with a catchier name than a "jewelry display box" but I haven't figured one out yet. I think I may call each version or different size a different name. Like "Chloe" or "Illiana." Maybe I'll do city names. One style can be "Savannah" and another "Paris." If you think of something fancy, let me know okay?

I'm working on two right now. They are smaller than my first one but I'm reworking the design so I wanted to work small and then go big. I'll be working on these all week and will post updates as they come along.

Friday, October 16, 2009

More Creations from Craft Class


Featuring from left to right: Rachael's paper star earrings (modeled by Tobi), Marlene and Lulu's plushie, Nicole's Bob Marley painting, and Ahsaki's pirate plushie.

Above we have Brendon working on one of her cosplay wigs and Coco and Taylor working on the base coat for a chair design they created.

To all the ladies and one gentleman in my class (just wait until you see what Jeremy is working on), thank you for really diving right into this class. It is so inspiring to see what you come up with and it is so motivating to work with you every day.

Thursday, September 24, 2009

Morgan's Box


This is Ruthie and this is the box she made for her friend Morgan:


Aside from the wonderful hand-painted stripes and hand-drawn name, I am so impressed with how classy a simple cardboard box can look. What a great way to repurpose material and what a wonderful gift for a friend. Well done Ruthie!

Sunday, September 20, 2009

Sundays are Lovely


I spent my Sunday afternoon at Sky Dive San Diego. What did you do?

Thursday, September 17, 2009

Creation ~ In Progress

A few shots of the class at work:


More to come as our creations continue!

Saturday, September 5, 2009

School is Back in Session

I'm teaching an elective (called X-block at our school) for any students who want to craft or D.I.Y. We meet three days a week and the students are working independently on what ever they're passionate about. This little notebook lunchbag was so back-to-school-y that I couldn't resist posting it as possible inspiration for some of the kids who still may not know what to do as their first project.

A lot of the students have already posted their projects in the comments section of my post below entitled "What are you Working on?"

I am going to emphasize using available resources this semester for our crafting and DIY projects, especially on repurposing items for something new. Do you have any examples of repurposed items that have been given new life? I'll post great examples here from time to time to show you my inspiration. Here's one that I thought was wonderful:


This is via Design*Sponge. It is a filing cabinet that has been repurposed as a planter. Brilliant! and beautiful!!

Thursday, September 3, 2009

What are You Working On?


I've been wanting to make a cloth pennant/banner for quite a while. This is one from Sweet Jessie's Shop on Etsy.com. I'm going to start with a paper pennant first in a fall theme for a craft swap I'm participating in.


I also want to whip up some of the boxes I mentioned in this post for some of the new teachers at my school.

What are you working on?

Monday, August 24, 2009

Free Handwritten Fonts


More examples of creative people doing creative things. Tripwire Magazine links to 45 different handwritten fonts, all for free and ready to download. No go make something pretty!

via, Craftzine.com

Inspiration is Everywhere - Framed Flowers and Shelves


I'm still diligently working on my frame ideas so any creative way to use frames grabs my attention. The folks at the. (that's right, their name is "the") have created these three beautiful ways to use them as decoration in your home.

School starts next week, so I'm focusing on lesson plans at the moment, but I'll still continue to post beautiful inspiration and Etsy finds until I have a new shop update.

Thursday, August 13, 2009

Inspiration is Everywhere - Rainy Day Cloud Box by ISLY


When I first discovered the wonders of Etsy.com and started to dig deep into DIY and the handmade movement I just couldn't believe how creative people were. I have a long blog roll I read every day in Google Reader and it is chock-full of blogs where people continue to dazzle me with their ingenuity and craftiness.


This craft is from ISLY (I Still Love You). I love how she describes her inspiration for the project and that she offers the template for her readers to download for free. You can guarantee that many of my fellow teachers and maybe even a student or two will be receiving one of these boxes this coming school year.

Wednesday, August 5, 2009

Ecstatic! First Jewelry Display Box Complete!

Wow. I did it.


I completed the first 100% handmade version of my idea. It was fascinating to create something I had been thinking about for so long, and to see it turn out so well!


I learned so much in the process of just making one of these babies. I can't wait to implement what I learned on the next one. A few of my friends decided to do a craft swap this summer, so this version was mailed off yesterday to the girl I got in the swap.

I went with purple because it is her favorite color. The next one is going to be done in a deep blue for another friend's birthday. I want to have a few under my belt before I start selling them on Etsy.

I still can't believe I did it! Go me!!

Sunday, August 2, 2009

First Handmade Prototype

Whoohoo! I finally compiled all of the tools I needed to start trying to hand-make my own version of my jewelry display cases. Eric helped me on this end.

Honestly, it was more moral support than anything else. I had made a dozen runs to Home Depot and Michael's searching for the perfect paint, for hooks of all sizes, for screen, for sawtooth hangers and L-braces, etc, but when it came to buying a mitre box I just really wanted someone standing with me in the Home Depot tool aisle debating the virtues of which yellow box was better, and it helped, it really did.

So I installed the box on the work table in our storage shed and got to work cutting angles on the wood I had picked up. I can't believe how much I've learned, and I'm not even finished with the first prototype.

Here are some more shots of what I'm working on:

Using the mitre box

Spacing out the different hooks

Bringing the pieces together & more to come!

Sensitive to Metal - Nickel Allergy

I have a sensitivity to nickel. A lot of the metal in costume jewelry contains nickel because it's fairly cheap. When I shop on Etsy I always search for nickel free earrings, but sometimes even the ones I pick up can make my earlobes start to burn after a few hours. So I'm trying this:

I've heard that if you coat the posts and backs of your earrings in clear nail polish it can really increase the amount of time you can wear the jewelry for daily. Has anyone else had success in doing this? I'll let you know how it goes.

Tuesday, July 28, 2009

Using a Light Box

I followed this tutorial yesterday to make a light box. It didn't take very long once I had assembled all of the materials.

A few things I've already learned:

1. The tutorial above suggests only leaving two flaps to control the light source coming in from above. I would suggest leaving three or following this tutorial where the entire top is covered in cloth or paper.

2. I grabbed this box because it was free and because I thought I would need a large box to work with the frames I'm making. It was just too big. Perhaps if I had an apartment or house it would be okay, but after making it I looked around my little storage locker and realized I had no where to store it. I'm going to make a smaller one that is tall (to accommodate a frame).

Here are some of the photos I took yesterday when playing with the new light box:


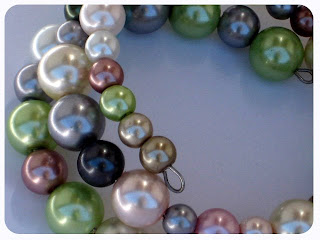
Whoohoo! Such clarity! This is a lovely bracelet from Out of the Blue, a sweet little shop on Etsy.

Here is a sneak peak of one of my first prototypes:

Again, I'm looking to create a jewelry display that shows off the beauty of one's jewelry while still being very functional. That cute little owl necklace is from Polished Two on Etsy and the gorgeous turquoise necklace is from Hey Renee Designs on Etsy as well.

I'm really impressed with how these photos turned out with the light box. Now I'm wondering how to create a similar, built-in situation on a wall so that I can take photos of the frames while they're hanging.

I'd like to be able to switch out color on the "wall" that they hang on as I'll be making different colored frames and want to show how they'd look in different styled homes.


Last shot - I'm working on hooks and how to best install them. I've got to get just the right drill bits to make sure the wood doesn't split as it did on my first prototype. I used a shadowbox that I picked up on sale from Aaron Brothers, but in my newer models I'm building everything from scratch, so I'm hoping that won't be a problem: